Construction stages and finished appearance
Illustrative visualization. Roof pitch is 3:12 across the 48-inch post spacing, producing a 12-inch drop. Roof overhangs continue the same pitch; confirm actual cut lengths and load capacity before construction.
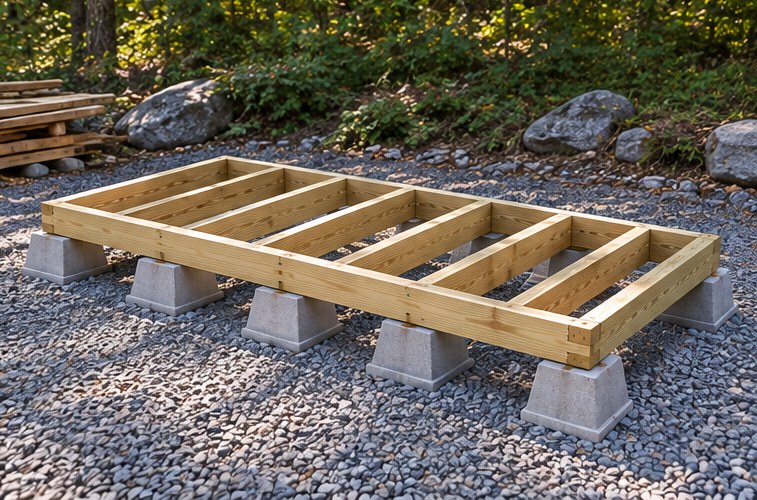
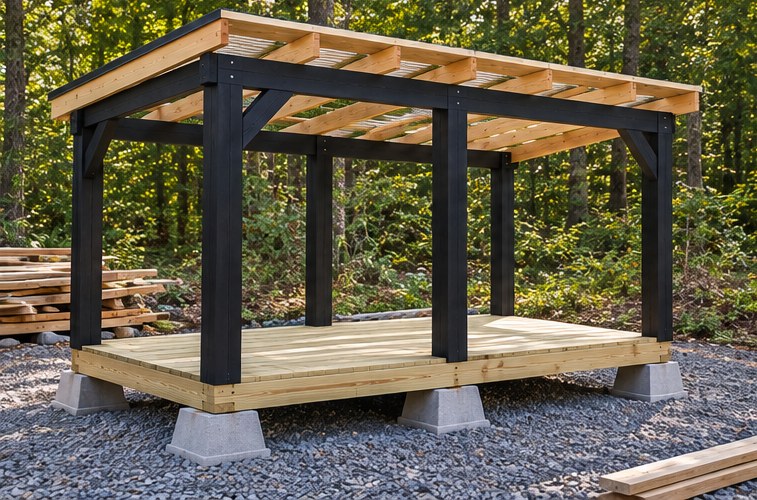
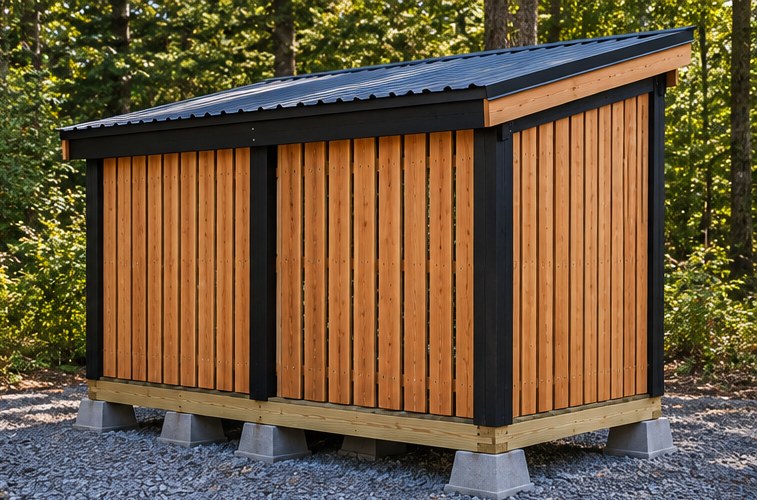
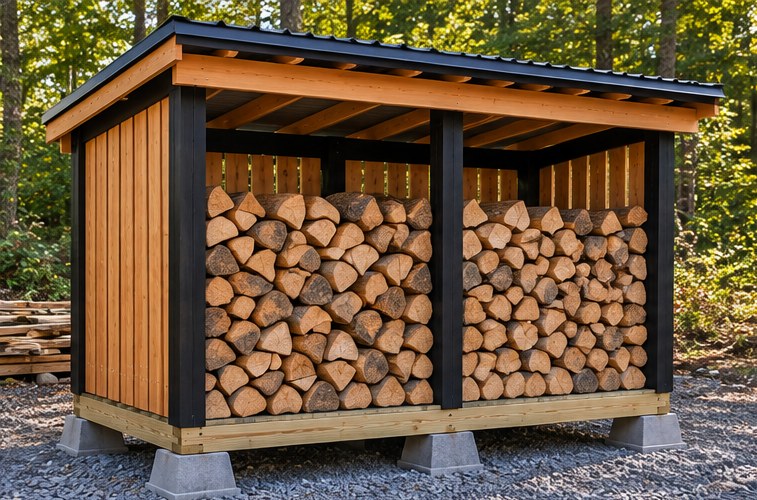
Concept renderings. Use the dimensioned plans below for layout; the renderings show six blocks and posts bearing on the deck, the plan uses nine blocks with posts in the block sockets.
Build run sheet
Updated after the Home Depot trip on Oct 18. Everything for the structure is on hand; the roof and the cedar are still to buy, so the build stops cleanly before the fascia.
Correction before you cut: block layout and center joist
The deck blocks have a 4×4 socket, so each post drops into a block and the rim or end joist bears on the block's ledge beside it. That means the six post blocks are centered on the posts, not on the frame edges. The middle joist also moves 2" off center so it sits beside the mid posts instead of where they stand.
| Block row | Distance from front edge of frame | Block centers, from left end of frame | What it carries |
|---|---|---|---|
| Front (posts) | 3¼" | 3¼" · 48" · 92¾" | Front posts in socket; front rim and end joists on ledge |
| Middle | 24" | ¾" · 50½" · 95¼" | End joists and center joist at mid-span |
| Rear (posts) | 44¾" | 3¼" · 48" · 92¾" | Rear posts in socket; rear rim and end joists on ledge |
Frame is 96" × 48" outside. Diagonals must match at 107 5⁄16". Joists at 16, 32, 64 and 80" on center; the center joist's left face at 49¾" (right against the mid posts) instead of at 48".
Today · Sunday afternoon (≈3½ hrs of daylight; sunset ≈ 6:05 pm)
- Sort and cut (30 min). Stack 2×6s, 4×4s, 2×4s separately, off the ground. Cut seven 45" joists from four 2×6×8s. Leave the posts uncut until the frame is set.
- Lay out (20 min). Stakes and string for a 96" × 48" rectangle, open side facing south/southwest. Check diagonals at 107 5⁄16". Mark the nine block centers from the table above with spray paint or nails.
- Pads and blocks (1½ hrs). At each mark, scalp a 14" square about 2" down, fill with paver base, tamp hard (end of a 4×4 offcut works), set the block with the socket square to the frame. Level all nine to each other with a straight 2×4 and a 4' level. This is the step that matters most.
- Floor frame (1 hr). Screw the two 96" rims to the two 45" end joists with Deckmate 3", three per corner. Set it on the blocks, check diagonals, then fit the five interior joists (end-screw 3 Deckmate per end). Shim any gap between frame and block with composite shims.
- Stop point. Frame square, level, sitting on all nine blocks. Cover the lumber pile. Nothing is standing that can fall over.
- If daylight remains: cut posts (three at 78", three at 66") and chamfer the tops on the table saw. Do not stand them tonight without braces.
Next session · full day, ideally with a helper
- Posts. Drop each into its block socket in the inside corner of the frame. Plumb both ways, brace to stakes with the 1×4s and offcuts. Corner posts: 2 TimberLOK through the rim and 2 through the end joist. Mid posts: 2 TimberLOK through the rim, 2 Deckmate from the center joist into the post.
- Floor slats. Ten 2×4s flat across the joists, 1½" spacer, notched around posts. Paslode 3" HDG with the framing nailer, two per joist.
- Beams. Clamp each 2×6×10 to the outer faces of its three posts, top flush, 12" past each end. Two TimberLOK per post.
- Nailers. 44¼" 2×4s flat between posts at 20" and 40" above the rim. Deckmate 3", two per end.
- Rafters and ties. Six 72" rafters at 24" o.c., 11" overhang front and rear. One H2.5A per rafter at each beam, fastened with SD9 screws only.
- Purlins, braces, diagonals. Four 2×4×10 purlins flat at 2, 24, 48 and 70" from the low edge. Two 24" knee braces at the front corners. Two 1×4 diagonals across the back posts. Remove the post stakes.
- Stop point. Fully framed and braced. It can stand unroofed until the panels arrive; load wood under a tarp on the purlins if needed.
After buying the roof and cedar fascia
- Fascia. Sides first (72", 14° ends), then front and rear lapping over. Senco 15 ga 2½" from the shelf at home, plus two Deckmate at each corner.
- Roof. Closure strips, then panels from the downwind end, one-rib overlap, roofing screws into every purlin.
- Stain once the PT passes the water-bead test. Phase 2 cedar walls whenever suits.
How it stays dry without a tarp
The roof overhangs 11–12" on every side, so rain on the pile is only wind-driven. The floor is 2×4 slats on 2×6 joists sitting 7" off the ground on deck blocks, so nothing wicks from below and air moves under the pile. Back and sides are 2⅝" cedar slats with 1" gaps: they stop most driven rain and let the pile breathe. Face the open front south or southwest; put the back toward prevailing wind-driven rain (northwest in most of CT).
Why it won't read as an outbuilding
Five decisions, all designed in rather than bolted on: black semi-transparent stain on every piece of PT so no green shows; vertical cedar slats at an even 1" gap, run from the ground to the roof so the rim and blocks are hidden; a ribbed steel roof in black instead of a plastic lid; 1×6 cedar fascia on all four roof edges so you see wood, not rafter ends; black hex-head TimberLOK screws at the visible post joints, and every other fastener hidden or countersunk. The pile itself is the facade, so stack split faces out, ends flush.
Reference looks
The finished look this plan is built to: vertical cedar slats on a black-stained frame, black steel roof with cedar fascia, stacked wood as the visual.
Drawings
Scale: 1 inch = 3 units. All dimensions in inches. Lumber is drawn at actual size (2×4 = 1.5 × 3.5, 2×6 = 1.5 × 5.5, 4×4 = 3.5 × 3.5, slat = 1 × 2⅝).
Cut list
| Part | Stock | Qty | Cut to | Notes |
|---|---|---|---|---|
| Frame (pressure-treated) | ||||
| Rim joists | 2×6×8 PT | 2 | 96" | No cut |
| Joists (incl. 2 end joists) | 2×6×8 PT | 7 | 45" | 2 per board → 4 boards |
| Floor slats | 2×4×8 PT | 10 | 96" | No cut; lay flat, ~1½" gaps |
| Front posts | 4×4×8 PT | 3 | 78" | Chamfer top edges ¼" on the table saw before install |
| Rear posts | 4×4×8 PT | 3 | 66" | Same |
| Beams (front & rear) | 2×6×10 PT | 2 | 120" | No cut |
| Rafters | 2×4×8 PT | 6 | 72" | Square cuts; 24" offcuts → braces |
| Knee braces | rafter offcuts | 2 | 24" | 45° both ends |
| Purlins | 2×4×10 PT | 4 | 120" | No cut; flat on rafters |
| Wall nailers (back 4, sides 4) | 2×4×8 PT | 8 | 44¼" | Between posts, flat, at 20" and 40" above the rim. 2 per board → 4 boards |
| Skin and trim (cedar) | ||||
| Slat stock | 5/4×6 cedar decking | — | rip to 2⅝" | Each 5½" board yields two 2⅝" strips (⅛" kerf). Rip everything first. |
| Back slats | 5/4×6×10 cedar | 26 | 59¾" | 4 per board (2 strips × 2 lengths) → 7 boards, 2 spare slats |
| Side slats, 13 per side | 5/4×6×12 cedar | 26 | 60" → 71" | Length = 60 + 0.9 × n (n = 0 rear … 12 front), top cut 14°. Pair slat n with slat 12−n on one strip (≤131") → 4 per board → 7 boards |
| Fascia, front & rear | 1×6×10 cedar | 2 | 121½" | Overlaps side fascia ends; front and rear fascia top edge beveled 14° optional |
| Fascia, sides | 1×6×8 cedar | 2 | 72" | Ends cut 14° plumb to match front/rear |
| Roof | ||||
| Roof panels | 29-ga ribbed steel 36"×96", black | 4 | 72" | Cut with a metal-blade circular saw or nibbler, never an abrasive wheel (burns the coating) |
Side slat lengths (inches): 60.0 · 60.9 · 61.8 · 62.7 · 63.6 · 64.5 · 65.4 · 66.3 · 67.3 · 68.2 · 69.1 · 70.0 · 70.9, rear to front. Cut all 13 for one side, then repeat. Verify the first two against the built frame before cutting the rest.
Purchase list
Split to match the assembly order. Phase 1 gets the shed standing, roofed, stained and usable. Phase 2 is the cedar walls. Combined ≈ $1,300 ($1,160–1,460). Items marked ✓ were bought Oct 18.
Phase 1 · Structure, fascia, roof
| Item | Qty | Est. each | Est. total | Notes |
|---|---|---|---|---|
| Lumber | ||||
| 2×6×8 PT, ground-contact | 6 | $9 | $54 | Rims + joists |
| 2×6×10 PT | 2 | $12 | $24 | Beams |
| 4×4×8 PT, ground-contact | 6 | $14 | $84 | Posts |
| 2×4×8 PT | 20 | $5.50 | $110 | 10 floor + 6 rafters + 4 nailer stock |
| 2×4×10 PT | 4 | $7 | $28 | Purlins |
| 1×4×8 PT | 2 | $5 | $10 | Temporary back diagonals; reuse elsewhere after phase 2 |
| 1×6×10 cedar | 2 | $18 | $36 | Front/rear fascia (goes on before the roof) |
| 1×6×8 cedar | 2 | $15 | $30 | Side fascia |
| Base and roof | ||||
| Concrete deck block | 9 | $10 | $90 | Or plastic Tuff Block |
| Paver base, 0.5 cu ft bag | 5 | $5 | $25 | 2" tamped pad under each block |
| 29-ga ribbed steel panel 3'×8', black/charcoal | 4 | $35 | $140 | Fabral, Union Corrugating, Metal Sales; any "Pro-Rib"/"Classic Rib" style |
| Metal roofing screws #10×1½" w/ EPDM washer, black, 100-pk | 1 | $18 | $18 | Into purlins |
| Foam closure strips for the panel profile | 2 pk | $10 | $20 | Top and bottom purlin; match the panel brand |
| Hardware and fasteners | ||||
| FastenMaster TimberLOK 4" structural wood screws, black hex head | 24 | $1.50 | $36 | 2 per post at rim, 2 per post at beam. Built-in washer head; 5/16" hex bit, impact driver. Must be 4": 1½" board + 3½" post = 5", so longer screws poke through. |
| Simpson H2.5A hurricane tie, ZMAX | 12 | $1.25 | $15 | Hidden behind fascia |
| Simpson SD9 1½" connector screws, 100-pk (SD9112R100) ✓ | 2 | $15 | $30 | For the ties: ~10 per H2.5A × 12 |
| Deckmate #9×3" green wood decking screws, 5 lb (309) ✓ | 1 | $35 | $35 | Frame corners, joists, nailers, purlins, braces, fascia corners |
| Paslode #657385 30° paper-tape 3"×0.120" ring-shank, hot-dip galvanized, 750 ✓ | 1 | $45 | $45 | Floor slats with the DeWalt 30° framing nailer |
| Senco 15 ga DA 2½" galvanized finish nails (A302509), on hand | 1 | — | $0 | Fascia only. Electro-galvanized: not for the cedar slats. |
| Finish | ||||
| Semi-transparent exterior stain, black, 1 gal | 1 | $45 | $45 | Cabot, Behr Premium, or Sikkens; oil-based penetrating. Frame only; apply once PT passes the water-bead test. |
| Optional | ||||
| 1" galvanized welded wire mesh, 3'×50' roll + ¾" fence staples | 1 | $70 | ($70) | Contains the stack until the slats go on; stays behind them. Not in total. |
| Phase 1 total | ≈ $880 | Expect $790–970 | ||
Phase 2 · Cedar walls
| Item | Qty | Est. each | Est. total | Notes |
|---|---|---|---|---|
| Lumber | ||||
| 5/4×6×10 cedar decking | 7 | $22 | $154 | Back slats (26 × 59¾", 2 spare) |
| 5/4×6×12 cedar decking | 7 | $26 | $182 | Side slats (26, 60"→71", cut to measured frame) |
| Fasteners | ||||
| 15 ga DA angled finish nails, 2", stainless (304/316) | 1,000 | $40 | $40 | For the Senco finish nailer; ~210 needed. Stainless only: galvanized streaks cedar. |
| Finish | ||||
| Penetrating cedar oil, clear or natural, 1 gal | 1 | $45 | $45 | Optional; untreated cedar silvers evenly in 1–2 years |
| Phase 2 total | ≈ $420 | Expect $370–490; cedar is the most volatile line | ||
Cost levers: PT 5/4×6 decking in place of cedar cuts phase 2 by ~$200 (stain it black and the whole shed goes dark); skip the cedar oil (−$45). Buy phase 2 cedar after measuring the built frame, and pick boards with the fewest knots: they get ripped in half.
Assembly order
Two phases. Phase 1 is the PT structure and roof: usable for stacking as soon as it's done. Phase 2 is the cedar walls, done whenever it suits, cut to the built frame.
Phase 1 · Structure, fascia, roof
- Site. Scalp the grass 6" beyond the 8×4 footprint. Set 9 deck blocks on 2" of tamped paver base at the centers in the run-sheet table (post blocks centered on the posts, not the frame edges). Level across every row; this is the one step where fussiness pays.
- Floor frame. Screw the two 96" rims to the two 45" end joists (Deckmate 3", three per corner). Set on blocks; check diagonals at 107 5⁄16". Add five interior joists at 16, 32, 64, 80" o.c. plus the center joist with its left face at 49¾" (beside the mid posts). Shim low spots with composite shims.
- Posts. Chamfer the tops. Drop each 4×4 into its block socket inside the rim at the corners and 48" mid-points. Plumb, brace, then two 4" TimberLOK through the rim (and two through the end joist at corners).
- Floor slats. Nail the ten 2×4s flat across the joists with a 1½" spacer, notching around posts. Two Paslode 3" HDG ring-shank per crossing.
- Beams. Clamp a 2×6×10 to the outer faces of the three front posts, top flush, 12" overhang each end. Two 4" TimberLOK screws per post. Repeat at the rear.
- Nailers. Screw 44¼" 2×4s flat between the posts at 20" and 40" above the rim, outer face flush with the post face: two on the back (each bay), one per side at each height. These go in now, not with the slats.
- Rafters and purlins. Six 72" rafters on edge at 24" o.c., 11" overhang front and rear, H2.5A at each beam. Four purlins flat on top at 2", 24", 48", 70" from the low edge. Fit the two knee braces.
- Temporary bracing. If the shed will stand without slats for more than a few weeks, screw two 1×4 diagonals across the back posts (an X or a single long diagonal). They come off when the back slats go on.
- Fascia (cedar, phase 1). Side fascia first (72", 14° ends), then front and rear (121½") lapping over them. Top edge flush with purlin top. Senco 15 ga 2½" into rafter ends and purlins, two Deckmate at each corner. This must precede the roof: the panel edges rest on it.
- Roof. Closure strips on top and bottom purlins. Start panels at the downwind end, overlap one rib, screw through the flat next to each rib into every purlin.
- Stain the frame. Once the PT passes the water-bead test (often 4–8 weeks), one coat, back-brushed. With no walls on, every face is reachable. The shed can hold wood while it waits; stain around the stack or before loading.
Phase 2 · Cedar walls (any time after phase 1)
- Measure the built frame. Rear height from 1" above the block to the rafter underside, and the same at the front post. Recalculate the 13 side slat lengths from those two numbers (linear between them). Pull the stack 1" off the walls.
- Rip and cut cedar. Rip the 14 decking boards to 2⅝" strips in one session. Cut 26 back slats at 59¾" (or to measured height) and 26 side slats to the recalculated lengths, 14° top cut.
- Side slats. Start at the rear post with a 1" spacer, bottom edge 1" above the blocks, nailing into rim, both nailers, and the post or beam at top. Repeat at the front. Works with wood already stacked inside.
- Back slats. Remove temporary bracing. Same method, left to right, 1" spacer; the first and last slat cover the side slats' ends.
- Cedar oil (optional) once the cedar has dried a week. Stack: split faces out, ends flush, bark up on the top row.